The premiere source of truth powering network automation. Open and extensible, trusted by thousands.
NetBox is now available as a managed cloud solution! Stop worrying about your tooling and get back to building networks.
Templating Device Configurations
By stretch | Tuesday, October 8, 2019 at 12:57 p.m. UTC
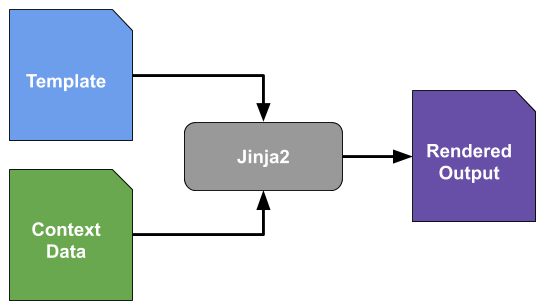
One of the core functions of network automation is the ability to generate network device configurations from a template. This is a discrete, intentional process which unfortunately is often conflated with the totally separate act of applying a rendered configuration to a device. In this article we'll look at how to establish a template from existing configurations, define and organize variable data, and ultimately render a series of configurations automatically using a simple Python script.
What is a Template?
The term template describes any sort of mold or pattern from which new, identical objects can be created. For instance, a cookie cutter is a sort of template that can be used to create an arbitrary number of identically-shaped cookies from a sheet of dough. But in our case, we're inexplicably more interested in creating network device configuration files than baking cookies, and creating wholly identical copies of a file isn't terribly useful, since each network device typically has a handful of unique characteristics such as hostname, authentication credentials, IP addresses, and so on.
To address this need to define changing pieces of data within an otherwise unchanging document, we employ variables. A variable serves as a placeholder within the template, signifying a particular piece of data that needs to be filled in. The below form is an example of a simple template.

The form has some base text that comprises the body of the message, and the person filling out the form selects a few specific pieces (variables) to communicate their specific message. Some of these variables require the user to select one of several predefined options, while others accept free-form input. Once completed, the form results in a syntactically correct, complete message, which the recipient will no doubt appreciate greatly.
We'll refer to the complete set of variables required to render a template as the context. The template itself remains static, but applying different contexts results in different end results.
Writing a Template
Templates can be used for many different media, but here we'll focus on raw text. You've probably written a template before without really thinking about it. Have you ever jotted down something like this in a notepad?
interface <name>
  description <description>
  ip address <ip> <mask>
  no shutdown
Well, that's a template! We've annotated four variables (name, description, IP address, and mask) using angled brackets. We can save this as a text file, then make a copy and populate unique values for each variable whenever we need to configure an interface, which results in a rendered configuration.
Of course, there are two problems with this approach. First, there is no formal definition instructing us how to define or process variable data. This will inevitably lead to errors as we tackle more complex scenarios. Second, we must render the template by hand each time, copying and pasting the value for each variable. Automating the population of data would be much more convenient. Both of these problems are solved by adopting a templating language.
There are several templating languages that might suit our purposes, but the de facto standard when it comes to network configurations is Jinja2. Jinja is a simple yet powerful language which allows for the use of advanced logic to render documents.
It should be noted that Jinja is completely agnostic as to the type of document being rendered: It does not care whether it is generating an HTML page, a Cisco IOS configuration, a DNS zone file, or whatever. Jinja is concerned only with its own tags and variables; everything else in the template file is simply passed through to the rendered document.
Jinja uses double curly braces to signify variables. We can rewrite our example template above in Jinja like this:
interface {{ name }}
  description {{ description }}
  ip address {{ ip }} {{ mask }}
  no shutdown
Well, that doesn't look very different, does it? But we're just getting started. What if we wanted to ensure that the description text is always in uppercase? Jinja provides filters, which provide a convenient mechanism for manipulating context data. We can use Jinja's built-in upper filter to force the provided data to uppercase text when rendering the template. And we probably have more than one interface to render: We can use a for loop to render an entire list of interfaces:
{% for interface in interfaces %}
interface {{ interface['name'] }}
  description {{ interface['description']|upper }}
  ip address {{ interface['ip'] }} {{ interface['mask'] }}
  no shutdown
!
{% endfor %}
Notice that the syntax for the for loop is slightly different: Jinja uses a curly brace paired with a percent sign to signify tags, which control the application of logic within a template.
We can also use conditional logic (an if statement) to determine whether or not the interface should be enabled:
{% for interface in interfaces %}
interface {{ interface['name'] }}
  description {{ interface['description']|upper }}
  ip address {{ interface['ip'] }} {{ interface['mask'] }}
  {% if interface['enabled'] %}no {% endif %}shutdown
!
{% endfor %}
While we're at it, let's add some global variables too:
hostname {{ hostname }}
ip name-server {{ dns_server }}
!
{% for interface in interfaces %}
interface {{ interface['name'] }}
  description {{ interface['description']|upper }}
  ip address {{ interface['ip'] }} {{ interface['mask'] }}
  {% if interface['enabled'] %}no {% endif %}shutdown
!
{% endfor %}
While obviously falling well short of a complete configuration, this example should give you an idea of what's possible with Jinja.
Defining Context Data
A template, nice as it may be, is only one half of the items needed to render a complete document. We also need to define our context (variable) data to be applied to the template. This data can be stored in any number of sources, and it's common practice in more robust implementations to draw context data from several different sources. For now, we'll keep things simple by defining all of our context data in a YAML file.
YAML is a type of data serialization language, which means it provides a mechanism for storing arbitrary data in a standard format. (JSON is another common serialization mechanism you may have encountered that's similar to YAML but which has a completely different format.) YAML provides a compact, human-friendly, and easily-parsed approach to declaring context data. Here's what context data for our template might look like in YAML:
hostname: Router1
dns_server: 8.8.8.8
interfaces:
  - name: GigabitEthernet0/0
    description: WAN uplink
    ip: 192.0.2.2
    mask: 255.255.255.252
    enabled: true
  - name: GigabitEthernet0/1
    description: LAN
    ip: 192.168.0.0
    mask: 255.255.255.0
    enabled: true
  - name: GigabitEthernet0/2
    description: Unused
What we have here is a dictionary (a list of key-to-value pairings) with three keys: hostname, dns_server, and interfaces. The hostname and dns_server keys are strings (arbitrary plain text), and the interfaces key points to a list of other dictionaries. Each dictionary within the interfaces list contains the attributes for a particular interface on the device being configured.
Remember, the context data are the unique components which complement the static templates: We'll ultimately define a unique set of context data for each unique device. Typically these will be stored as files; for example, router1.yaml, router2.yaml, router3.yaml, and so on.
Rendering a Template
We'll write a simple Python script to render our template. First, we'll need to ensure that the Jinja2 and YAML Python packages are installed:
$ sudo pip3 install jinja2 yaml
Next, we'll save our template as template.jinja2, and our context data as data.yaml. Finally, we'll write a script that accepts the template and data files as command line arguments, and save it as render_template.py.
import sys
import yaml
from jinja2 import Environment, FileSystemLoader

# Initialize the Jinja2 environment to load templates
# from the current directory
env = Environment(loader=FileSystemLoader('.'))
template = env.get_template(sys.argv[1])

# Load the context YAML file into a Python dictionary
with open(sys.argv[2], 'r') as datafile:
    context = yaml.load(datafile)

# Render the template and print the resulting document
rendered_template = template.render(**context)
print(rendered_template)
Executing the script with the template and data files as arguments will bring everything together:
$ python3 render_template.py template.jinja2 router1.yaml
hostname Router1
ip name-server 8.8.8.8
!

interface GigabitEthernet0/0
  description WAN UPLINK
  ip address 192.0.2.2 255.255.255.252
  no shutdown
!

interface GigabitEthernet0/1
  description LAN
  ip address 192.168.0.0 255.255.255.0
  no shutdown
!

interface GigabitEthernet0/2
  description UNUSED
  ip address
  shutdown
!
Check that out! A fully-generated configuration file. Now, each time we need to generate the configuration for a new device, we just need to create a new YAML file with the relevant data.
Hmm, there is an issue, though. The last interface doesn't have an IP address defined in the YAML file, but it still has an ip address command. We can fix that by wrapping an if statement around the IP address line in the template:
hostname {{ hostname }}
ip name-server {{ dns_server }}
!
{% for interface in interfaces %}
interface {{ interface['name'] }}
  description {{ interface['description']|upper }}
  {% if interface['ip'] %}ip address {{ interface['ip'] }} {{ interface['mask'] }}{% endif %}
  {% if interface['enabled'] %}no {% endif %}shutdown
!
{% endfor %}
Now the generated output looks like this:
hostname Router1
ip name-server 8.8.8.8
!

interface GigabitEthernet0/0
  description WAN UPLINK
  ip address 192.0.2.2 255.255.255.252
  no shutdown
!

interface GigabitEthernet0/1
  description LAN
  ip address 192.168.0.0 255.255.255.0
  no shutdown
!

interface GigabitEthernet0/2
  description UNUSED

  shutdown
!
Although this output is valid, the blank line where the IP address should go shouldn't be there. Jinja allows us to shrink whitespace in the rendered output by adding a hyphen inside either the beginning or ending symbol of a tag. This will automatically remove any resulting whitespace before or after the tag, respectively, which allows us to write nicely organized templates without introducing any unnecessary blank lines or indentations.
Let's add a hyphen to the end of the for tag and the if/endif tags around the interface line:
hostname {{ hostname }}
ip name-server {{ dns_server }}
!
{% for interface in interfaces -%}
interface {{ interface['name'] }}
  description {{ interface['description']|upper }}
  {% if interface['ip'] -%}
    ip address {{ interface['ip'] }} {{ interface['mask'] }}
  {% endif -%}
  {% if interface['enabled'] %}no {% endif %}shutdown
!
{% endfor %}
Our output is now nice and succinct:
$ python3 render_template.py template.jinja2 router1.yaml
hostname Router1
ip name-server 8.8.8.8
!
interface GigabitEthernet0/0
  description WAN UPLINK
  ip address 192.0.2.2 255.255.255.252
  no shutdown
!
interface GigabitEthernet0/1
  description LAN
  ip address 192.168.0.0 255.255.255.0
  no shutdown
!
interface GigabitEthernet0/2
  description UNUSED
  shutdown
!
We've just scratched the surface of what Jinja2 can do, but hopefully you are encouraged to begin writing your own templates if you haven't already.
Posted in Configuration Management
Comments
October 9, 2019 at 3:40 p.m. UTC
Hi,
Your blog is invaluable.
Can I reuse some of your python codes, in my own writings. Due reference will be given in the writing.
Regards
October 13, 2019 at 12:53 p.m. UTC
This is nice and guess could work in automation for device deployment.
I had come up with a solution of my own, where I was provided with excel file with interface, its description and VLAN number, I used excel to create rows of configuration:
!
Interface Gig0/0/1
description
switchport mode access
switchport access vlan xxx
!
Once the lines are dragged to complete for all necessary interfaces, move this text to Notepad and remove extra tab spaces then save the file as HTML file, then open the file
will provide for line breaks which allows to copy all this text and dump in the target devices..
This did come handy for multiple switch provisioning which had each interface labelled with descriptions and had different VLAN's
December 4, 2019 at 6:17 p.m. UTC
Hi Jeremy, good to see you back blogging again. Been a fan since the BGP cheatsheet days. lol. keep up the good work.
I have been missing around with Jinja2 and was thinking of building a configuration generation script. Basically, parse old configuration for specific information and then dump that info into a CSV file and lastly use jinja2 to generate a new configuration. You article will give me some more ideas. thanks,
December 10, 2019 at 1:27 a.m. UTC
Very cool. Good for branch WAN/CPE deployments in which many cookie cutter builds exist. The script presented here can help save time generating many configuration files in a short time. Now, how to marry this up with Zero Touch Provisioning to automate applying these configurations to our fresh out of the box devices?
December 18, 2019 at 5:51 p.m. UTC
nice work on this article and on your website overall
December 30, 2019 at 6:17 a.m. UTC
Jinja syntax looks very like Django template language
March 12, 2020 at 9:11 p.m. UTC
Hi great read, I am doing this but for switch configs and have a problem where I have defined a voice vlan for some ports and not for others. So data looks like
access_ports: - name: Tw1/0/1 vlan: 180 voice: 200 description: Access
However for this port, it's not a voice port
access_ports: - name: Twt1/0/10 vlan: 129 voice: description: Access
My template puts in
switchport voice vlan
Which then fails when I push the config
So I need to find a way to say if voice vlan is defined put switchport voice vlan in and if it's not defined
do not put switchport voice vlan
My template currently looks like this
{% for intf in access_ports %} interface {{ intf["name"] }} description {{ intf["description"] }} switchport access vlan {{ intf['vlan'] }} switchport voice vlan {{ intf["voice"] }} spanning-tree portfast
May 2, 2020 at 10:32 p.m. UTC
Hi Jeremy! I'm also a packet-enthusiastic and i really like your work, I learned a lot from this blog over the years. I have developed a project named BruteShark. It will be great if you will take a look at it and tell what do you think about it: :-) https://github.com/odedshimon/BruteShark
Thank, Oded